Trad Rack: How to Build Your First One (2024 Guide)

Published on: 01/31/2023
For some climbers, trad climbing is the crown jewel of all the rock climbing disciplines. It’s the perfect mixture of adventurous climbing and traditional ethics. Not to mention they are probably addicted to crack climbing.
We must admit that climbing a wall with no fixed gear and only the equipment on your harness is a special feeling. However, the elephant in the room is obvious (and expensive) – the trad climbing rack.
To go trad climbing, you have to bring a trad rack. Otherwise, you’re just free soloing. Building your first trad climbing rack can feel like a daunting task. That’s why we’ve curated this article to help explain the key components of a trad rack and to share some tips to get started and maintain your rack for the long run.

What is Trad Climbing?
Trad climbing, short for traditional climbing, is a style of free climbing that does not rely on fixed gear, like bolts on a sport climbing route, to protect a rock climb. Instead, trad climbing involves placing protection into cracks to mitigate the risk of a large fall.
However, when you cast off on a trad route, you may encounter some bolts or old pitons. This is typically the case when no natural crack feature is present to use for protection instead. However, the spirit of the climb remains — to ascend the wall using only the gear you bring on your harness and not leave anything behind.
What’s a Trad Rack?!
At this point, we’ve probably said the word “rack” 100 times. If you are wondering what that is, let’s explain.
Trad rack is a term used by climbers to describe the collection of equipment they use for trad climbing. Trad climbers use the term rack frequently. A trad climber’s trad rack can be their entire collection of trad gear they’ve collected over the years. Or the smaller rack they intend to bring up a specific climb.
In most cases, trad racks come in three sizes– single, double, and triple. A single rack is conventionally thought of as a rack that contains a camming device in every size, from fingers to fists. Single racks will also include a small collection of stoppers.

Double and triple racks contain doubles or triples in specific sizes, or all sizes, from fingers to fists. Anything larger than a triple rack is rare and typically only applicable for particular trad routes or climbing areas like Indian Creek, Utah.
Larger racks can be built for aid climbing also. These racks would include pitons, copperheads, brassies, cam hooks, beaks, and much more.
For most committed trad climbers, the gold standard is a double rack. That will allow them to climb most anything, not including what their partner can offer. With their partner’s gear, building a triple or quad rack quickly is easy.
How to Start Building Your Trad Rack
To begin building your rack, it’s strategic to think of it in terms of three important categories.
- Passive protection: stopper, hexes, tricams
- Active protection: camming devices
- Anchor building equipment: carabiners, cord, slings
Passive Protection
This protection category includes stoppers of various varieties, hexes, and tricams. Passive equipment has no moving parts apart from a connected sling or cable.
Passive protection like stoppers is placed into constrictions and cracks like a chockstone. The placement quality will depend on the surface contact on the walls of the stopper and the rock quality. When properly placed, the passive piece of equipment can catch a fall by becoming trapped in the rock.

Recommended Passive Protection
Active Protection
This category is on the opposite side of the spectrum. Active protection, like camming devices, relies on moving mechanical pieces to function properly.
Climbers place active protection into cracks by engaging it first. Pulling on the cam’s triggers effectively makes the cam smaller. After the cam is placed and the triggers are released, the cam expands into the crack for added security.
The quality of the cam placement will depend on the surface contact of the cam’s lobes and the rock quality. When properly placed, a cam can catch a fall by expanding into the crack and gripping the rock to remain in place.

Recommended Active Protection
Anchor Building Equipment
Due to the lack of fixed bolts on trad climbs, climbers must build their own anchors. Anchor building is an art form that takes time and training to make safe. We won’t go into details about how to build anchors here. But we will recommend the equipment we like to use to build bomber anchors.

Non-locking carabiners
Ideal for attaching gear to your harness and non-critical connection points in anchors.
Locking carabiners
Ideal for critical connection points, like the masterpoint, belay device, and personal tethers.
Sewn runners
Various lengths, from shoulder-length to quad-length, and different materials like Dyneema slings or Nylon slings are ideal for building anchors in different scenarios.
Accessory cord
One of the most versatile pieces of equipment for building trad anchors is a nylon accessory cord, often called cordelette. Typically, 16-20 feet is recommended with a diameter no smaller than 6mm.
Other Helpful Pieces of Gear to Add
Over time your rack will grow and evolve, so long as you aren’t losing any pieces. Remember, the rack you bring to the base of the cliff may be different from the rack you bring up the climb. We recommend consulting guidebooks and local climbers for additional information.
As you start your first trad rack, take notes to remember how your rack functioned and what was missing. Don’t be afraid to make changes. Protect the climb in a way that makes you feel secure, not what other people think.
It’s common for your first trad rack to include only a few items. That’s normal because it’s easy to supplement with your partner’s gear. As your collection of climbing gear grows and your rack evolves, consider investing in the following equipment.

Offset camming devices
Offset cams function like normal cams, except that the lobes are different sizes. This is especially helpful in granite cracks. Granite cracks are notoriously flared and not parallel-sided, so traditional cams sometimes cannot be well-placed. On the other hand, offset cams can fit into the flared sections more reliably.
Nut tools
Removing stoppers from cracks can be difficult, especially if the stopper catches a fall. A nut tool, like the Wild Country Pro Key, is a unique device that makes retrieving the stuck stopper easier. A nut tool can also be used for cleaning cams and spreading peanut butter.
Gear sling
Having a home for all your climbing gear is essential. Oftentimes, a gear sling is all you need to keep your cams and stoppers all in one place and organized by size.
Alpine quickdraws
Check out our article on alpine draws here!
Offset nuts
Offset nuts function like offset cams. They thrive in flared placements where the tapered and asymmetrical shape of the nut can be placed seamlessly into the constriction.

Small cams
As crack climbing gets more difficult, cracks tend to shrink. Therefore, you will need other smaller cams to protect the climb adequately.
Larger cams
Crack climbing can also become very wide. This is called off-width climbing. In this case, “normal” sized cams may not be big enough. If the standard rack goes up to four-inch cams, consider buying a five or six-inch cam if you want to continue climbing wide cracks.
Maintaining your Rack
Trad racks don’t maintain themselves. So, if you regularly climb on your gear, then you should also be routinely maintaining it every season. Maintaining your rack includes three simple tasks– cleaning and lubing cams, replacing frayed or broken trigger wires, and re-slinging cams.
Cleaning and Lubing Cams
Of the three, cleaning and lubricating your cams are the most straightforward maintenance tasks. If you want to keep it simple, cleaning your cams with warm soapy water will do the trick.
However, if you want to treat your cams to luxury, we recommend lubing them after cleaning them. There are specialty lubricants for cams, but most wax-based lubricants will work.
If you have spare time, we recommend cleaning and lubricating your carabiners, especially if the gates are crunchy or sticking open. Whatever you end up cleaning and lubing, make sure to dry it sufficiently.
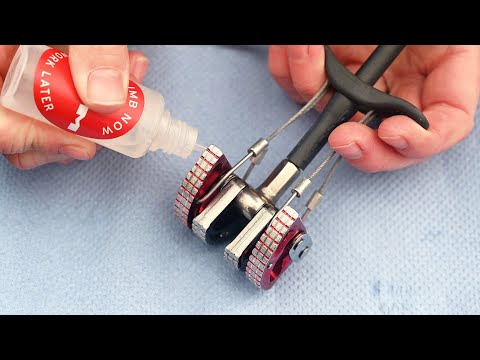
Trigger Wire Repairs
The trigger wires on your cams are responsible for opening and closing the cam’s lobes when you pull on the trigger. Over time, the wires may begin to fray and even completely break.
Replacing trigger wires is more involved than cleaning and lubricating. Therefore, we recommend sending your cams in to be professionally maintained if you have the time and money.
However, it is possible to replace your trigger wires if you possess the DIY spirit. This option is faster and cheaper but requires more work.
Re-slinging Cams
When properly maintained, the hardware on cams can last for decades. However, the lifespan of the sewn slings attached to the devices is much shorter. Therefore, most cam manufacturers recommend re-slinging your cams every five years, if not sooner.
When you replace the slings is ultimately up to you. Keep an eye out for cuts, abrasions, fuzziness, and fraying. However, we do not condone re-slinging the cams yourself. It will be significantly safer to send your cams to a professional to replace the slings.
Important tips
Climb with Friends
If your trad climbing rack needs to be bigger for a particular objective, climb with friends who also have a rack and know how to trad climb. You can share gear with friends and customize the rack to match the objective’s protection requirements.
Get Proficient at Cleaning Trad Gear
You should be as adept at cleaning gear as you are placing it. Cleaning stuck gear is an art form that will lengthen the life span of your rack, if not help it grow after cleaning stuck gear, you find out climbing, also known as “booty.”

Consider Secondhand Equipment
Purchasing secondhand equipment is a good way to save money and grow your rack simultaneously. However, if you go down this route, make certain that the gear you are purchasing is functioning and the seller is reliable.
Try Out Multiple Manufacturers
It may be tempting to build your entire rack with gear from a single manufacturer like Black Diamond or Wild Country. However, we recommend creating a rack that includes pieces from multiple manufacturers to get a more developed spectrum of sizes. A BD .75 might not fit the finicky crack, but a .75 from Wild Country might.
Protect The Climb In Your Own Way
It’s easy to get caught up with the rack someone else brought for specific climbs. But they may be stronger, more experienced, or simply unprepared without enough gear. So when in doubt, don’t try to reduce weight. Bring the extra gear and protect the climb in a way that makes you feel secure.
Final Thoughts
Building a trad climbing rack can be quite an investment. Compared to other climbing styles like bouldering, there is significantly more equipment to consider to begin trad climbing safely. Therefore, we recommend taking your time and building your rack slowly.
Start with a single rack of cams and stoppers for your first trad rack. Then, climb with friends to supplement what you are missing. Over time, buy more cams and stoppers in the sizes you use the most. Later, invest in niche pieces of protection to fill all the gaps in your rack. Eventually, you will have a double or triple rack and be able to climb practically anything.
Have fun and be safe. Remember to double-check!

Frequently Asked Questions
To say it bluntly, climbing equipment is expensive. But think about it this way: it’s the gear that will keep you safe, so investing in quality stuff is worth it. Depending on the brand and the discounts you find, a full rack with a complete set of cams and stoppers runs about US$1,000.
If you are concerned about saving weight, consider buying ultralight cams. However, they are significantly more expensive. Therefore, they are not the friendliest to entry-level climbers.
The answer to this question is still up for debate. Typically, climbers use the cam manufactured closest to their home country. Therefore, many north Americans like Black Diamond. However, folks in Europe tend to prefer Wild Country and DMM. If you want to avoid choosing one side or the other, we recommend building a rack containing different manufacturers’ cams.